How to manage EAPs at different sites across Internet using Omada Controller (via VPN Tunnel with DHCP Option138) (Old UI)
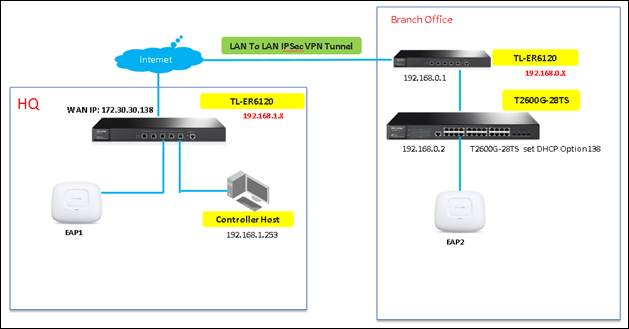
As shown below, HQ and Branch Office are connected with each other through IPSec VPN tunnel. In HQ, there are TP-Link EAP controller, EAP1 and TL-ER6120 (VPN Router) in subnet 192.168.1.0/24. In branch office, there are EAP2, layer 3 switch T2600G-28TS as DHCP Server (supporting DHCP option138) and TL-ER6120 (VPN router) in subnet 192.168.0.0/24.

This document will introduce how to manage EAPs at different sites across Internet using TP-Link EAP/Omada controller (via VPN Tunnel with DHCP option138). About how to choose VPN Router and set up site to site IPSec VPN tunnel, please refer to: Setting up Site-to-Site IPsec VPN on TP-Link Router
Step1. Configurations on T2600 switch in Branch Office
1.1 Change switch’s default IP address from 192.168.0.1 to 192.168.0.2 to avoid IP conflict with gateway router.

1.2 Enable DHCP Server Function on T2600G-28TS, and set DHCP Option138 as the IP address of Remote EAP/Omada Controller Host (192.168.1.253). And then the DHCP Server will tell the EAPs will the EAP/Omada Controller is, so that the EAP/Omada Controller and EAPs can communicate with each other among different subnets

1.3 Configure DHCP IP Address Pool (192.168.0.0/24) for EAP in branch office.

Step2. VPN Settings on TL-ER6120 in Branch Office
2.1 Disable DHCP server function on TL-ER6120 in Branch Office.

2.2 Go to VPN -> IKE -> IKE Proposal, and complete IKE Proposal settings shown as below.

2.3 Go to VPN -> IKE -> IKE Policy, and complete IKE Policy settings shown as below.

2.4 Go to VPN -> IPsec -> IPsec Proposal, and complete IPSec Proposal settings shown as below.

2.5 Go to VPN -> IPsec -> IPsec Policy, and complete IPsec Policy settings shown as below. Note: “Remote Gateway” should be the WAN IP address of TL-ER6120 in HQ.

Step3. VPN settings on TL-ER6120 in HQ are similar with “Step2”. Here we don’t describe them in detail any more. After all settings, the VPN tunnel will be established between HQ and Branch Office shown as below.

Step4. Run EAP Controller. The EAP will appear in EAP/Omada controller’s “pending” list, which means you can use EAP/Omada controller to adopt and manage this EAP now shown as below.


Is this faq useful?
Your feedback helps improve this site.
TP-Link Community
Still need help? Search for answers, ask questions, and get help from TP-Link experts and other users around the world.

4.0-F_normal_1593323197059j.png)
_EU_3.0_2401__normal_20240119043538b.png)