How to configure Parental Controls on the Wi-Fi Routers (case 1)
This function allows you to set up unique restrictions on internet access for each member of your family. You can block inappropriate content, set daily limits for the total time spent online and restrict internet access to certain times of the day.
Note: Please make sure the Private MAC Address is disabled on your clients, otherwise, the parental control won't take effect.
If your router has a different parental controls interface, please refer to
How to configure Parental Controls on the Wi-Fi Routers (case 2)?
Please follow the steps below to configure Parental Controls.
1. Log in to the web-based interface of the router. If you don’t know how to do that, please refer to
How do I log into the web-based Utility (Management Page) of TP-Link wireless router?
2. Go to Advanced > Parental Controls and enable Parental Controls.

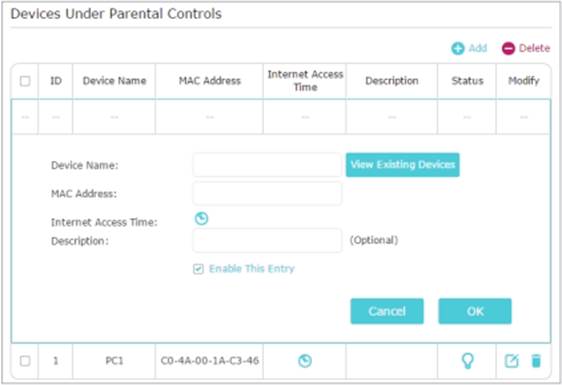
3. Click Add. And then Click View Existing Devices, and select the access device. Or, input the Device Name and MAC Address manually.

1. Click the  icon to set the Internet Access Time. Drag the cursor over the appropriate cell(s) and select from 20:00 (8PM) on Sunday to 18:00 (6PM) on Friday. Then click OK.
Internet Access Time: Does not mean that you can access internet at that time, instead, it displays the restriction access time period; in other word, the filter rules setup on the parental control page will take effect during the selected time period.
The time schedule takes effect based on the system time of the router. Go to Advanced > System Tools > Time Settings to set the correct system time.

2. Enter a Description for the entry, tick the Enable This Entry checkbox, and then click OK.
3. Select Blacklist as the restriction policy.
Blacklist: The controlled devices cannot access any websites containing the specified keywords during the Internet Access Time period.
4. Click  . Enter facebook.com and click Save. You can add up to 32 keywords.

Now your children have no access to Facebook during the Internet Access Time you set.
1. Click the  icon to set the Internet Access Time. Drag the cursor over the appropriate cell(s) and select from 18:00 (6PM) to 22:00 (10PM) on Saturday and Sunday. Then click OK.

2. Enter a Description for the entry, tick the Enable This Entry checkbox, and then click OK.
3. Select Whitelist as the restriction policy.
Whitelist: The controlled devices can only access websites containing the specified keywords during the Internet Access Time period.
4. Click  . Enter wikipedia.org and www.tp-link.com. Then click Save. You can add up to 32 keywords.

Now your children can only have access to wikipedia.org and www.tp-link.com during the Internet Access Time you set.
1. Click the  icon to set the Internet Access Time. Drag the cursor over the appropriate cell(s) and select from 22:00 (10PM) to 7:00 the next morning from Sunday to Thursday. Then click OK.
2. Enter a Description for the entry, tick the Enable This Entry checkbox, and then click OK.
3. Select Whitelist as the restriction policy. Do not add any keyword to the whitelist, which means blocking all internet browsing access.

Now your children cannot have internet access during the Internet Access Time you set.
Get to know more details of each function and configuration please go to Download Center to download the manual of your product.
Is this faq useful?
Your feedback helps improve this site.
TP-Link Community
Still need help? Search for answers, ask questions, and get help from TP-Link experts and other users around the world.
-1.0-A_normal_1584496536672l.png)
3.0_A_RGB_normal_1584493572647x.png)
